深入淺出 axios(一):預設 axios 物件、Axios 類別、攔截器
axios 是一個 Promise based 的 HTTP 請求工具,他可以運行在「瀏覽器環境」與「Node.js」中。相信在 AJAX 技術被廣泛應用的今日,稍微有一點經驗的捧油門對他一定都不陌生。因此這系列分享不會特別著重在如何使用 axios,而是針對幾個我覺得 axios 有趣、好用的地方,研究他的原始碼是如何撰寫的,從中吸收寶貴的經驗。那就讓我們一起看下去吧!
前言
本篇的 axios 版本為 0.21.0
這是一個系列的分享,預計會有兩篇,本文是該系列的第一篇。在本文當中會提到以下這些內容:
- 預設導入的 axios 設計。
- Axios 類別(Class)設計。
- 攔截器類別(InterceptorManager Class)設計。
axios 可應用在「瀏覽器環境」與「Node.js」環境中。在瀏覽器環境下使用了 XMLHttpRequest 而在 Node.js 環境則使用了 http 模組。由於目前工作上的使用經驗還是以瀏覽器端為主,因此本系列暫時也只會針對瀏覽器端的功能做研究,分享。
在開始先小小提一下,自從學習了 TypeScript 後,在使用一套工具過程中,我會很習慣不斷地確認這個工具提供的 interface 有哪些(如果有提供的話)並搭配文件使用。
axios 請求流程
一開始,先來看看當透過 axios 發出請求(request)到取得到資料(response)的過程中發生了那些事情,以下是我自製的 axios 請求流程圖:
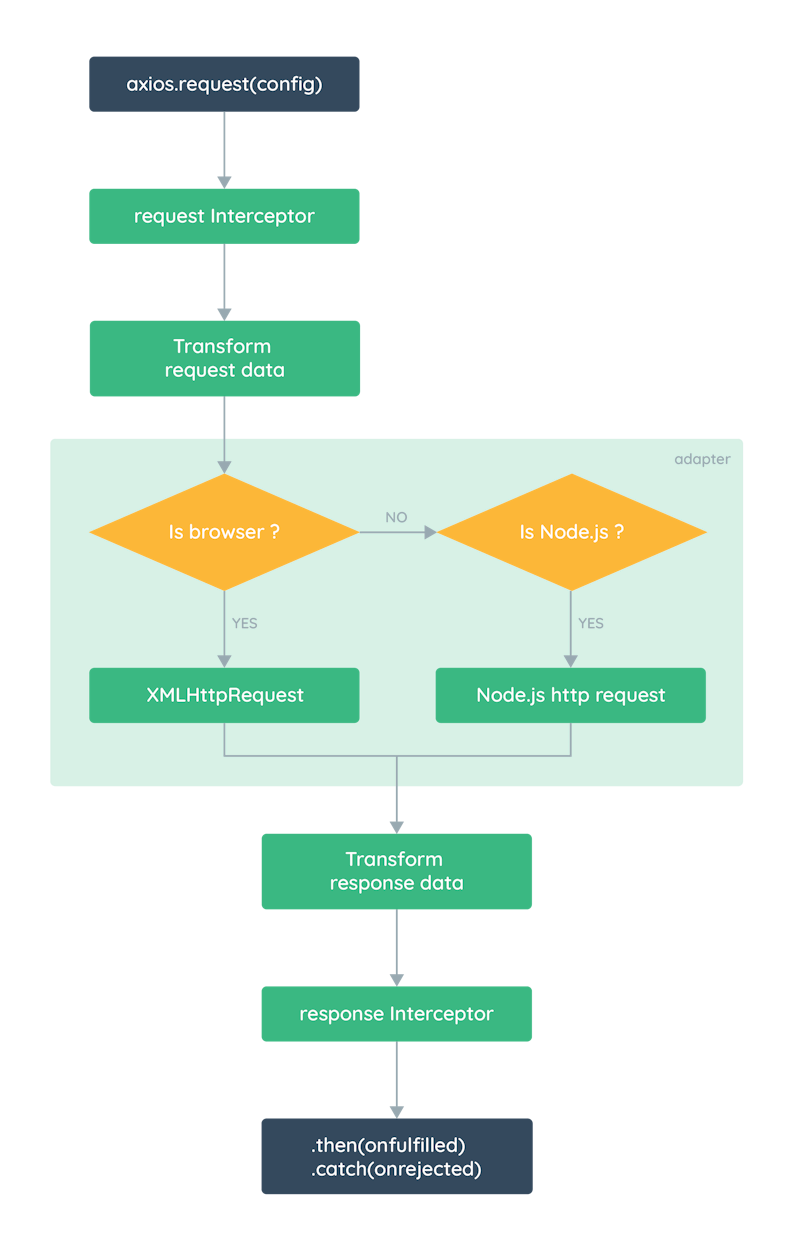
從流程圖可以知道,當透過 axios 發出一個請求後,會先經過請求攔截器(Interceptors),之後依照執行環境選擇適當的請求適配器(adapter,介面)發出請求。取得請求的回應後,經過處理回應的攔截器,最後回傳給使用者,完成整個 HTTP 請求。
預設導入的 axios 設計
要瞭解 axios 提供了哪些方法(methods)與屬性(properties),我們可以先透過 axios 官方提供的 interface 快速瀏覽:
export interface AxiosInstance {
  (config: AxiosRequestConfig): AxiosPromise;
  (url: string, config?: AxiosRequestConfig): AxiosPromise;
  defaults: AxiosRequestConfig;
  interceptors: {
    request: AxiosInterceptorManager<AxiosRequestConfig>;
    response: AxiosInterceptorManager<AxiosResponse>;
  };
  getUri(config?: AxiosRequestConfig): string;
  request<T = any, R = AxiosResponse<T>> (config: AxiosRequestConfig): Promise<R>;
  get<T = any, R = AxiosResponse<T>>(url: string, config?: AxiosRequestConfig): Promise<R>;
  delete<T = any, R = AxiosResponse<T>>(url: string, config?: AxiosRequestConfig): Promise<R>;
  head<T = any, R = AxiosResponse<T>>(url: string, config?: AxiosRequestConfig): Promise<R>;
  options<T = any, R = AxiosResponse<T>>(url: string, config?: AxiosRequestConfig): Promise<R>;
  post<T = any, R = AxiosResponse<T>>(url: string, data?: any, config?: AxiosRequestConfig): Promise<R>;
  put<T = any, R = AxiosResponse<T>>(url: string, data?: any, config?: AxiosRequestConfig): Promise<R>;
  patch<T = any, R = AxiosResponse<T>>(url: string, data?: any, config?: AxiosRequestConfig): Promise<R>;
}

export interface AxiosStatic extends AxiosInstance {
  create(config?: AxiosRequestConfig): AxiosInstance;
  Cancel: CancelStatic;
  CancelToken: CancelTokenStatic;
  isCancel(value: any): boolean;
  all<T>(values: (T | Promise<T>)[]): Promise<T[]>;
  spread<T, R>(callback: (...args: T[]) => R): (array: T[]) => R;
  isAxiosError(payload: any): payload is AxiosError;
}

declare const axios: AxiosStatic;
當我們使用 import axios from 'axios' 時,此時的 axios 型別為 AxiosStatic。之後如果是透過 axios.create() 取得的回傳值,型別則會是 AxiosInstance。
這裡可以發現,如果是透過 axios.create() 建立的實例,就不會有像是 create()、isCancel()、 isAxiosError() 諸如此類的方法可以用,也不能取得 Cancel、CancelToken 等屬性。
createInstance
我們知道,不論是預設導入的 axios 或是 axios.create() 的回傳值都可以直接用來發送 HTTP 請求,像這樣:
axios({/** config */})

// 或

axios('url', {/** config */})
而這部分在原始碼的部分是這樣設計的:
var bind = require('./helpers/bind');
var Axios = require('./core/Axios');
var mergeConfig = require('./core/mergeConfig');
var defaults = require('./defaults');

function createInstance(defaultConfig) {
  var context = new Axios(defaultConfig);
  var instance = bind(Axios.prototype.request, context);

  return instance;
}

var axios = createInstance(defaults);

axios.create = function create(instanceConfig) {
  return createInstance(mergeConfig(axios.defaults, instanceConfig));
};

// 略
// 這個地方會再將一些方法或屬性掛到要導出 axios 上。
// 這裡也是預設導入的 `axios` 與 `axios.create()` 的回傳值型別會不太一樣的原因。

module.exports.default = axios;
我們可以看到,不論是預設導入的 axios 或是 axios.create() 的回傳值,他們都是由 createInstance() 這個 function 回傳的 function。
在 createInstance() 中,首先會建立一個 Axios 類別的實例(context),但不是直接將這個實例回傳出來,而是回傳了一個變數(instance),這個 instance 存了一個綁定了以 context 為 this 的 Axios 原型上的 request 方法。
說起來很饒口,但就是每當呼叫 axios({ /** config */ }) 時,執行的其等同於執行:
Axios.prototype.request.bind(context)({ /** config */ })
所以我們知道,不論是預設導入的 axios 或是 axios.create() 回傳的都是一個 request 的 function。不過除此之外我們還可以這樣使用:
axios.request({ /** config */ })

axios.delete('url', { /** config */ })
axios.get('url', { /** config */ })
axios.head('url', { /** config */ })
axios.options('url', { /** config */ })

axios.post('url', { /** data */ }, { /** config */ })
axios.put('url', { /** data */ }, { /** config */ })
axios.patch('url', { /** data */ }, { /** config */ })
這又是怎麼做到的呢?因為在 JavaScript 的世界中,function 其實也是一個物件,所以就算是 function 也可以用物件的方式存取屬性與其他方法,而在 createInstance 裡面還做了兩件事情:
var utils = require('./utils');

function createInstance(defaultConfig) {
  // 略

  utils.extend(instance, Axios.prototype, context);
  utils.extend(instance, context);

  return instance;
}
// lib/utils.js

/**
 * Extends object a by mutably adding to it the properties of object b.
 *
 * @param {Object} a The object to be extended
 * @param {Object} b The object to copy properties from
 * @param {Object} thisArg The object to bind function to
 * @return {Object} The resulting value of object a
 */
function extend(a, b, thisArg) {
  forEach(b, function assignValue(val, key) {
    if (thisArg && typeof val === 'function') {
      a[key] = bind(val, thisArg);
    } else {
      a[key] = val;
    }
  });
  return a;
}

module.exports = {
  // 略
  extend: extend
}
由上面的原始碼可見,extend 會將 b 物件上有的方法或屬性複製到 a 物件上,如果是複製方法,則還需要傳入 thisArg。
了解 extend 後就可以解釋了。首先,先將 Axios 類別原型上的方法複製到 instance 上,並綁定 this 為 context。再來將 context 上的屬性也複製到 instance 上。因此回傳的 instance 除了可以當 function 使用外,也可以存取到 createInstance 中建立的 context 上的屬性與方法。
補充:
mergeConfig是 axios 中合併預設 config 與傳入的config的方法。而utils囊括了各種好用的小 function。
- axios mergeConfig GitHub 連結 -
mergeConfig原始碼。- axios utils GitHub 連結 -
utils原始碼。
Axios 類別(Class)設計
再來要進到 Axios 類別的部分。
透過官方提供的 interface 我們可以得知,Axios 類別原始 interface 大致上長這樣:
// 官方並沒有針對 Axios 類別提供 interface

interface Axios {
  defaults: AxiosRequestConfig;
  interceptors: {
    request: AxiosInterceptorManager<AxiosRequestConfig>;
    response: AxiosInterceptorManager<AxiosResponse>;
  };
  getUri(config?: AxiosRequestConfig): string;
  request<T = any, R = AxiosResponse<T>> (config: AxiosRequestConfig): Promise<R>;
  get<T = any, R = AxiosResponse<T>>(url: string, config?: AxiosRequestConfig): Promise<R>;
  delete<T = any, R = AxiosResponse<T>>(url: string, config?: AxiosRequestConfig): Promise<R>;
  head<T = any, R = AxiosResponse<T>>(url: string, config?: AxiosRequestConfig): Promise<R>;
  options<T = any, R = AxiosResponse<T>>(url: string, config?: AxiosRequestConfig): Promise<R>;
  post<T = any, R = AxiosResponse<T>>(url: string, data?: any, config?: AxiosRequestConfig): Promise<R>;
  put<T = any, R = AxiosResponse<T>>(url: string, data?: any, config?: AxiosRequestConfig): Promise<R>;
  patch<T = any, R = AxiosResponse<T>>(url: string, data?: any, config?: AxiosRequestConfig): Promise<R>;
}
屬性
Axios 類別生成的屬性有兩個:
defaults:- 型別:Object
- 該 axios 實例的預設 config,也就是建構時傳入的
instanceConfig。
interceptors- 型別:Object
- 該 axios 實例的
request與response攔截器。
建構函式原始碼如下:
var InterceptorManager = require('./InterceptorManager');

function Axios(instanceConfig) {
  this.defaults = instanceConfig;
  this.interceptors = {
    request: new InterceptorManager(),
    response: new InterceptorManager()
  };
}
可以看到,Axios 的攔截器是由一個叫 InterceptorManager 的類別建立的,它提供了一些間單的操作來新增、刪除攔截器,細節會在下個部分會詳細探究。
方法
類別方法部分,包含了一個 request 以及其他與 HTTP request methods 小寫同名的方法,外加一個 getUri。接著來看看 request 做了哪些事情吧!
發出請求 axios.request()
var dispatchRequest = require('./dispatchRequest');

// 略

Axios.prototype.request = function request(config) {
  if (typeof config === 'string') {
    config = arguments[1] || {};
    config.url = arguments[0];
  } else {
    config = config || {};
  }

  config = mergeConfig(this.defaults, config);

  if (config.method) {
    config.method = config.method.toLowerCase();
  } else if (this.defaults.method) {
    config.method = this.defaults.method.toLowerCase();
  } else {
    config.method = 'get';
  }

  return new Promise(function (resolve, reject) {
    try {
      dispatchRequest(config).then(resolve, reject)
    } catch (e) {
      reject(e);
    }
  })
};
從上面的設計可以得知,在 request() 中會先對傳入的 config 與預設的 config this.default 合併,補齊一些必要的屬性,像是 method。如果合併後 config 裡面還是沒有 method 這個屬性,預設會使用 GET 方法。最後觸發 dispatchRequest() 發出請求。
補充:
dispatchRequest()中會針對請求資料做最後的轉換(Transform request data)並依照依照執行環境選擇適當的請求適配器發出請求。收到回應資料後,會再將回應資料專換(Transform response data)過後再交由回應攔截器處理。
補充: 由一開始的條件判斷可以得知,其實
request()方法提供了兩種使用方式,如下:// 官方並沒有針對 Axios 類別提供 interface interface Axios { // 略 request<T = any, R = AxiosResponse<T>> (config: AxiosRequestConfig): Promise<R>; request<T = any, R = AxiosResponse<T>> (url: string, config: AxiosRequestConfig): Promise<R>; // 略 }不過第二種方式在
AxiosInstance並沒有提供型別,在文件中也沒有提及,我猜這應該是因為第二種方法其實只是為了要服務axios(url[, config])這種用法而產生的。
到這邊基本的 request() 已經可以運作,但還有一個很重要的功能沒有實踐:攔截器(Interceports)
加入攔截器(Interceports)
如果有使用過像是 Express.js 的捧油,可能會聽過 中間件(Middleware) 這個功能。攔截器的概念跟中間件很相似,可以用於例如:處理身分驗證,或是共同的邏輯處理。
從上面的建構式中得知,攔截器是透過 InterceptorManager 類別建構出的實例。我們還沒有介紹到這個類別,但現在可以先想像他是個陣列,並有一個 forEach 的方法可以遍歷所有存在陣列中的攔截器。
Axios 實例上的攔截器又分成「請求攔截器」與「回應攔截器」兩個,分別在發出請求前執行,與接收到回應後執行。因此 axios.request() 的設計會這樣調整:
Axios.prototype.request = function request(config) {
  // 略

  var chain = [dispatchRequest, undefined];
  var promise = Promise.resolve(config);

  this.interceptors.request.forEach(function unshiftRequestInterceptors(interceptor) {
    chain.unshift(interceptor.fulfilled, interceptor.rejected);
  });

  this.interceptors.response.forEach(function pushResponseInterceptors(interceptor) {
    chain.push(interceptor.fulfilled, interceptor.rejected);
  });

  while (chain.length) {
    promise = promise.then(chain.shift(), chain.shift());
  }

  return promise;
};
我們先將原本要觸發的 dispatchRequest 與一個 undefined 存進一個名為 chain 的陣列中。為什麼要這樣呢?可以先看看 MDN 上 Promise.prototype.then() 的語法:
// 取自 MDN

p.then(onFulfilled[, onRejected]);
所以 chain 的設計會是 onFulfilled 與 onRejected 一組一組的陣列。在陣列中的 0、2、4、6 位置會是前一個非同步成功後的 onFulfilled,1、3、5、7 位置則會是當前一個非同步發生錯誤時呼叫的 onRejected。
在每次發出請求前,都會分別將所有攔截器串在 chain 的前後。如果是「請求攔截器」,就用 Array.prototype.unshift 一組一組放到 chain 前面;如果是「回應攔截器」,就用 Array.prototype.push 一組一組推到 chain 後面。
var chain = [
  /**
   * 請求攔截器
   */
  requestFulfilled, requestRejected,
  /**
   * 發出請求
   */
  dispatchRequest, undefined,
  /**
   * 回應攔截器
   */
  responseFulfilled, responseFulfilled
]
將所有攔截器串進 chain 後再用 while 迴圈搭配 Array.prototype.shift 將他們兩個一組的串起來:
Promise.resolve(config)
  /**
   * 請求攔截器
   * 發出請求前一個一個執行
   */
  .then(requestFulfilled, requestRejected)
  /**
   * 發出請求
   */
  .then(dispatchRequest, undefined)
  /**
   * 回應攔截器
   * 接收到回應後一個一個執行
   */
  .then(responseFulfilled, responseFulfilled)
這樣就完成了整個 axios.request() 的設計。
注意
const promise1 = promise.then(onFulfilled, onRejected)

const promise2 = promise.then(onFulfilled).catch(onRejected)
我們有兩種方法針對 Promise 鍊的錯誤處理有兩種寫法,但者兩者的意義有很大的不同。在
promise1與promise2中的promise發生錯誤,兩種的onRejected都可以接到錯誤,但如果錯誤是發生在onFulfilled,在promise1的onRejected不會接到錯誤,可是promise2可以接到。
其他與 HTTP request methods 小寫同名方法
axios 除了 axios.request() 可以發出請求外,還有像是 get()、post()、put()、patch()、delete()、head()、options() 等方法。不過本質上他們都是對 axios.request() 再做一層包裝,所以直接上程式碼:
/**
 * 對應
 * - axios.delete(url[, config])
 * - axios.get(url[, config])
 * - axios.head(url[, config])
 * - axios.options(url[, config])
 */
utils.forEach(['delete', 'get', 'head', 'options'], function forEachMethodNoData(method) {
  Axios.prototype[method] = function(url, config) {
    return this.request(mergeConfig(config || {}, {
      method: method,
      url: url,
      data: (config || {}).data
    }));
  };
});

/**
 * 對應
 * - axios.post(url[, data[, config]])
 * - axios.put(url[, data[, config]])
 * - axios.patch(url[, data[, config]])
 */
utils.forEach(['post', 'put', 'patch'], function forEachMethodWithData(method) {
  Axios.prototype[method] = function(url, data, config) {
    return this.request(mergeConfig(config || {}, {
      method: method,
      url: url,
      data: data
    }));
  };
});
除了 getUri()外,以上就是 Axios 類別的實作設計。
攔截器類別(InterceptorManager Class)設計
先來確認一下攔截器的用法:
攔截器型別
export interface AxiosInterceptorManager<V> {
  use(onFulfilled?: (value: V) => V | Promise<V>, onRejected?: (error: any) => any): number;
  eject(id: number): void;
}
axios 文件 - 攔截器 連結
註冊攔截器 use():
// Add a request interceptor
axios.interceptors.request.use(function (config) {
    // Do something before request is sent
    return config;
  }, function (error) {
    // Do something with request error
    return Promise.reject(error);
  });

// Add a response interceptor
axios.interceptors.response.use(function (response) {
    // Any status code that lie within the range of 2xx cause this function to trigger
    // Do something with response data
    return response;
  }, function (error) {
    // Any status codes that falls outside the range of 2xx cause this function to trigger
    // Do something with response error
    return Promise.reject(error);
  });
如果要刪除指定攔截器可以用 eject() 方法:
const myInterceptor = axios.interceptors.request.use(function () {/*...*/});
axios.interceptors.request.eject(myInterceptor);
知道了攔截器的介面,我們可以開始看 InterceptorManager 是如何實作。
在 InterceptorManager 實例上,我們需要一個陣列存放已註冊的攔截器:
function InterceptorManager() {
  this.handlers = [];
}
之後不論是透過 use() 註冊的攔截器或是用 eject() 移除,都是對 handlers 這個陣列的操作,下面一一介紹。
use() 註冊攔截器
分析
註冊攔截器時,我們需要傳入 fulfilled 與 rejected,並存放到 handlers 中。每當註冊一個攔截器,就回傳一個數字用做之後移除用的參數。
如果記得 Axios.prototype.request 如何使用攔截器,我們就可以知道 handlers 的型別大致如下:
interface InterceptorHandler = {
  fulfilled?: (value: V) => V | Promise<V>,
  rejected?: (error: any) => any
}

type InterceptorHandlers = InterceptorHandler[]
實作
InterceptorManager.prototype.use = function use(fulfilled, rejected) {
  this.handlers.push({
    fulfilled: fulfilled,
    rejected: rejected
  });
  return this.handlers.length - 1;
};
每當註冊一個攔截器,就會將他包成物件推入 handlers 陣列中,並回傳物件在該陣列的位置為何。之後如果要移除改攔截器,只要找到這個位置,就可以將該攔截器刪除。
eject() 刪除攔截器
分析
需要接收一個指定位置(數字)將該位置的攔截器移除。
實作
InterceptorManager.prototype.eject = function eject(id) {
  if (this.handlers[id]) {
    this.handlers[id] = null;
  }
};
這邊需要注意,刪除攔截器不能動到陣列的長度,在這裡是將原本的攔截器設定為 null,因為如果改變了長度,會造成先前註冊攔截器的位置錯亂,之後刪除傳入其他的位置很有可能會無法刪到真正想刪除的攔截器。
forEach() 遍歷(私有方法)
這裡會特別提到這個私有方法是因為我們可以發現,eject() 會將刪除的攔截器設定為 null。但前面知道 Axios.prototype.request 會將 handlers 中每一個攔截器的 fulfilled 與 rejected 推入陣列,但如果改成 null 不就會出錯了嗎?
所以這邊只是要提醒,在這裡的 forEach 需要檢查遍歷到的位置攔截器是否還存在,存在才去將攔截器串起來,否則就略過該位置。
InterceptorManager.prototype.forEach = function forEach(fn) {
  utils.forEach(this.handlers, function forEachHandler(h) {
    if (h !== null) {
      fn(h);
    }
  });
};
結語
本篇中我們瞭解了預設導入的 axios 與 axios.create() 建立的物件是如何透過 createInstance 初始化,也瞭解到為什麼 axios 可以當作一個 function 使用,又可以像物件一樣存取到其他的方法與屬性。
後面也看了 Axios 類別與他用來管理攔截器的 InterceptorManager 類別的設計。在操作上活用了 Promise 與陣列的各項操作,真的非常令人玩味。
目前預計之後會分別探討 axios 使用到的 XMLHttpRequest 介紹與 CancelToken 類別設計,可以期待一下。
參考資料
請我喝杯咖啡
如果這裡的內容有幫助到你的話,一杯咖啡就是對我最大的鼓勵。
