用 Vue.js 實作時下流行的深色模式(Dark Mode 🌓)網頁
現在越來越多網站,開始加入「深色模式」的切換選擇,關於這個近期逐漸流行的色彩模式切換到底該怎麼做呢?在技術上會有什麼限制呢!
在本文當種會提到這些內容:
- 使用 Vue 2.6.0+ 版本的
Vue.observable(object)實作色彩模式切換。 - 其他的色彩模式切換的方式。
- 使用 CSS 變數(CSS Variables)簡單管理色彩樣式。
這些內容會以我目前使用的 Vue 的靜態網頁框架 Gridsome 示範。
前言
現在越來越多網站,開始加入「色彩模式」的切換選擇,或是會根據系統預設的色彩模式調整 CSS 的設置。
深色模式除了讓畫面看起來質感瞬間往上提升一個層次外,對於我們這種需要長時間盯著螢幕的攻城小小獅來說,更可以減緩眼睛疲勞的累積,據說還很省電呢!?所以為了跟上潮流,我也在整個部落格的右上方加入了顏色模式切換的功能,讓親愛的捧油們可以切換最舒服的環境來閱讀,是不是很貼心啊!
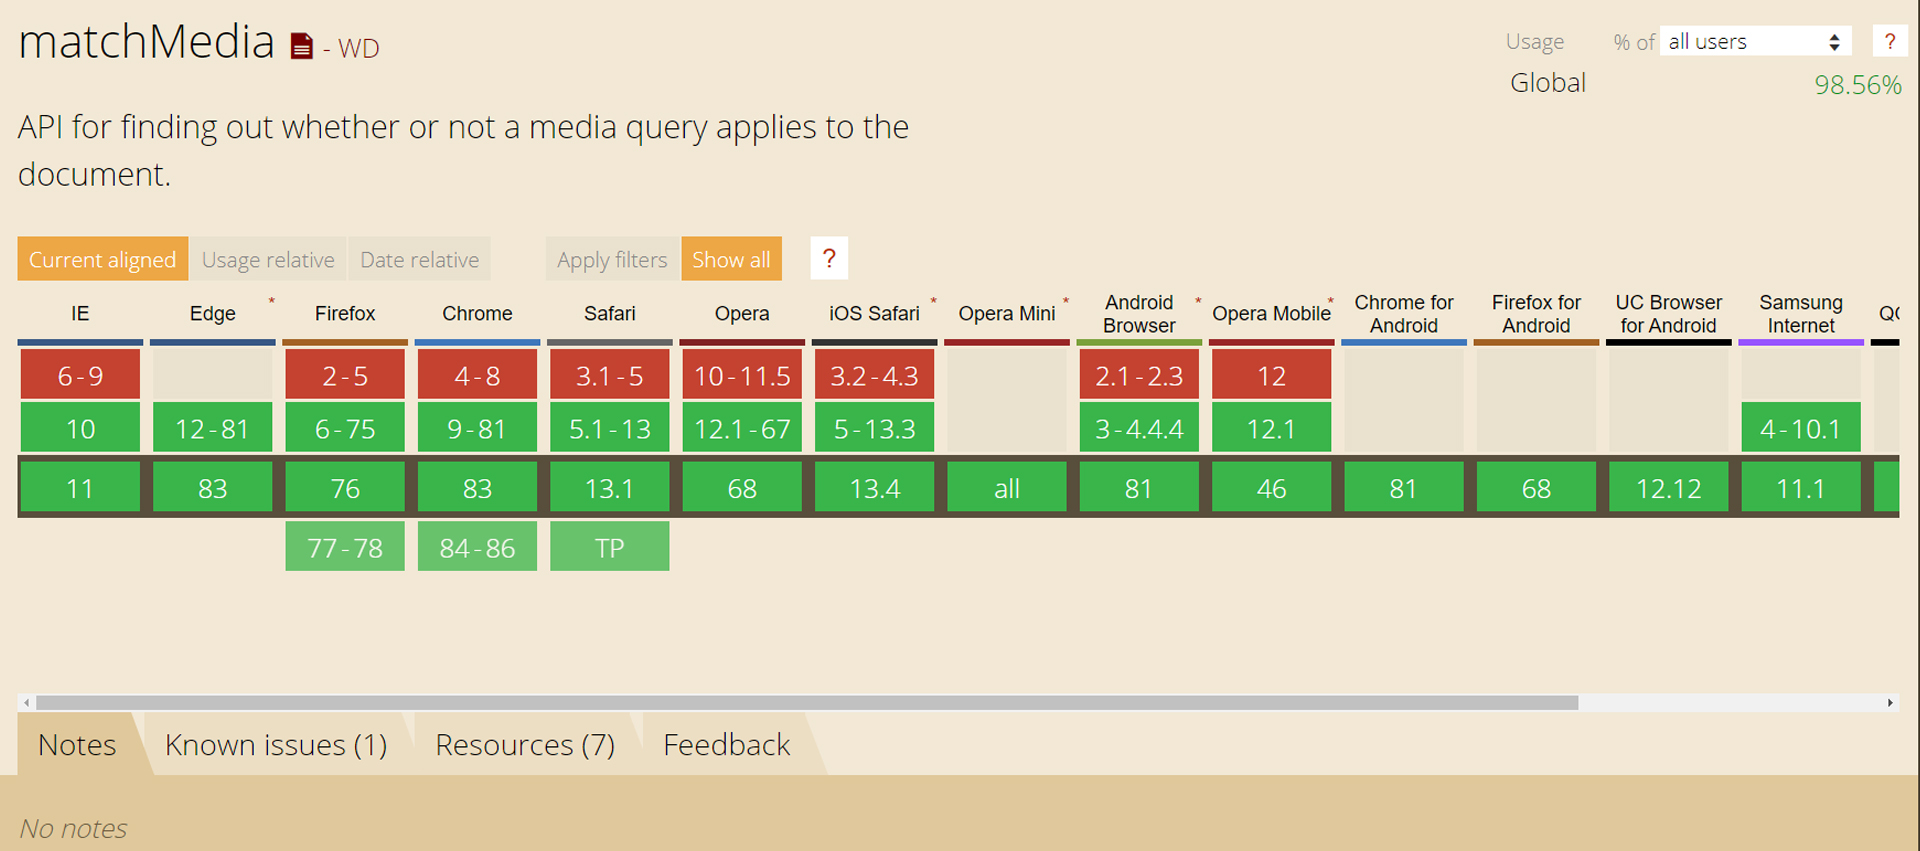
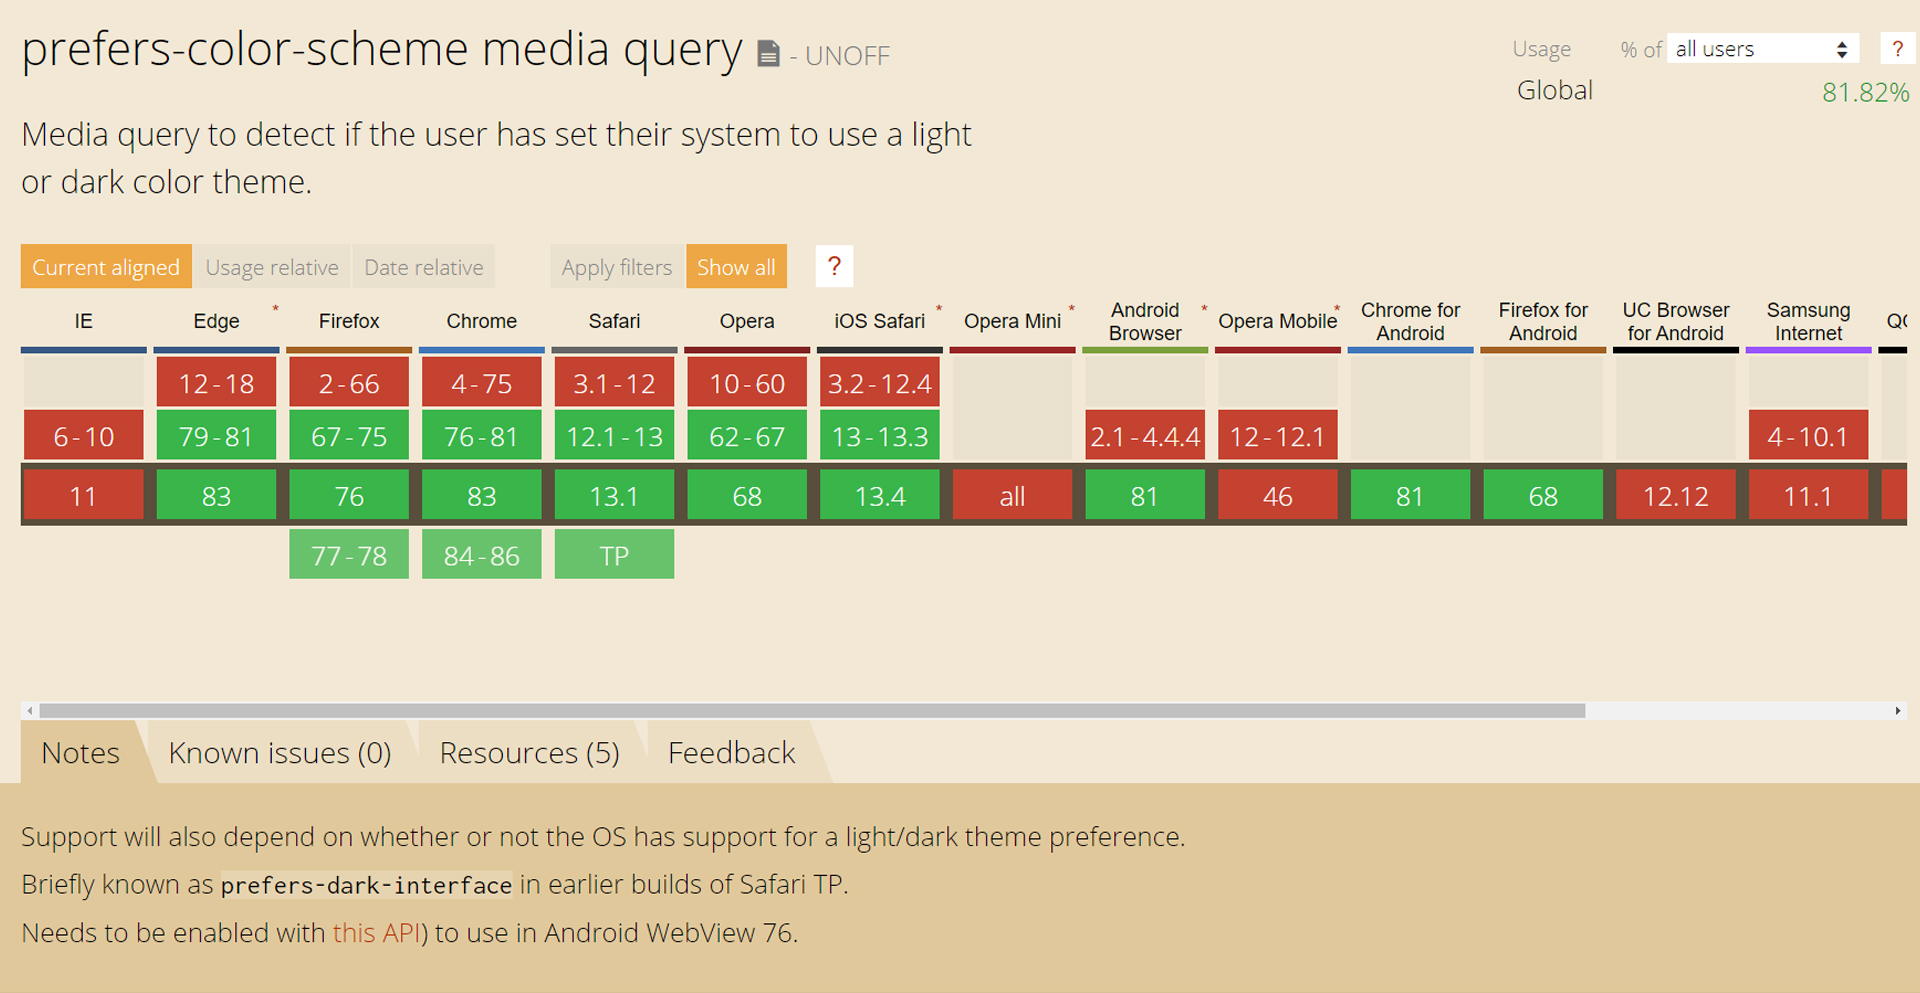
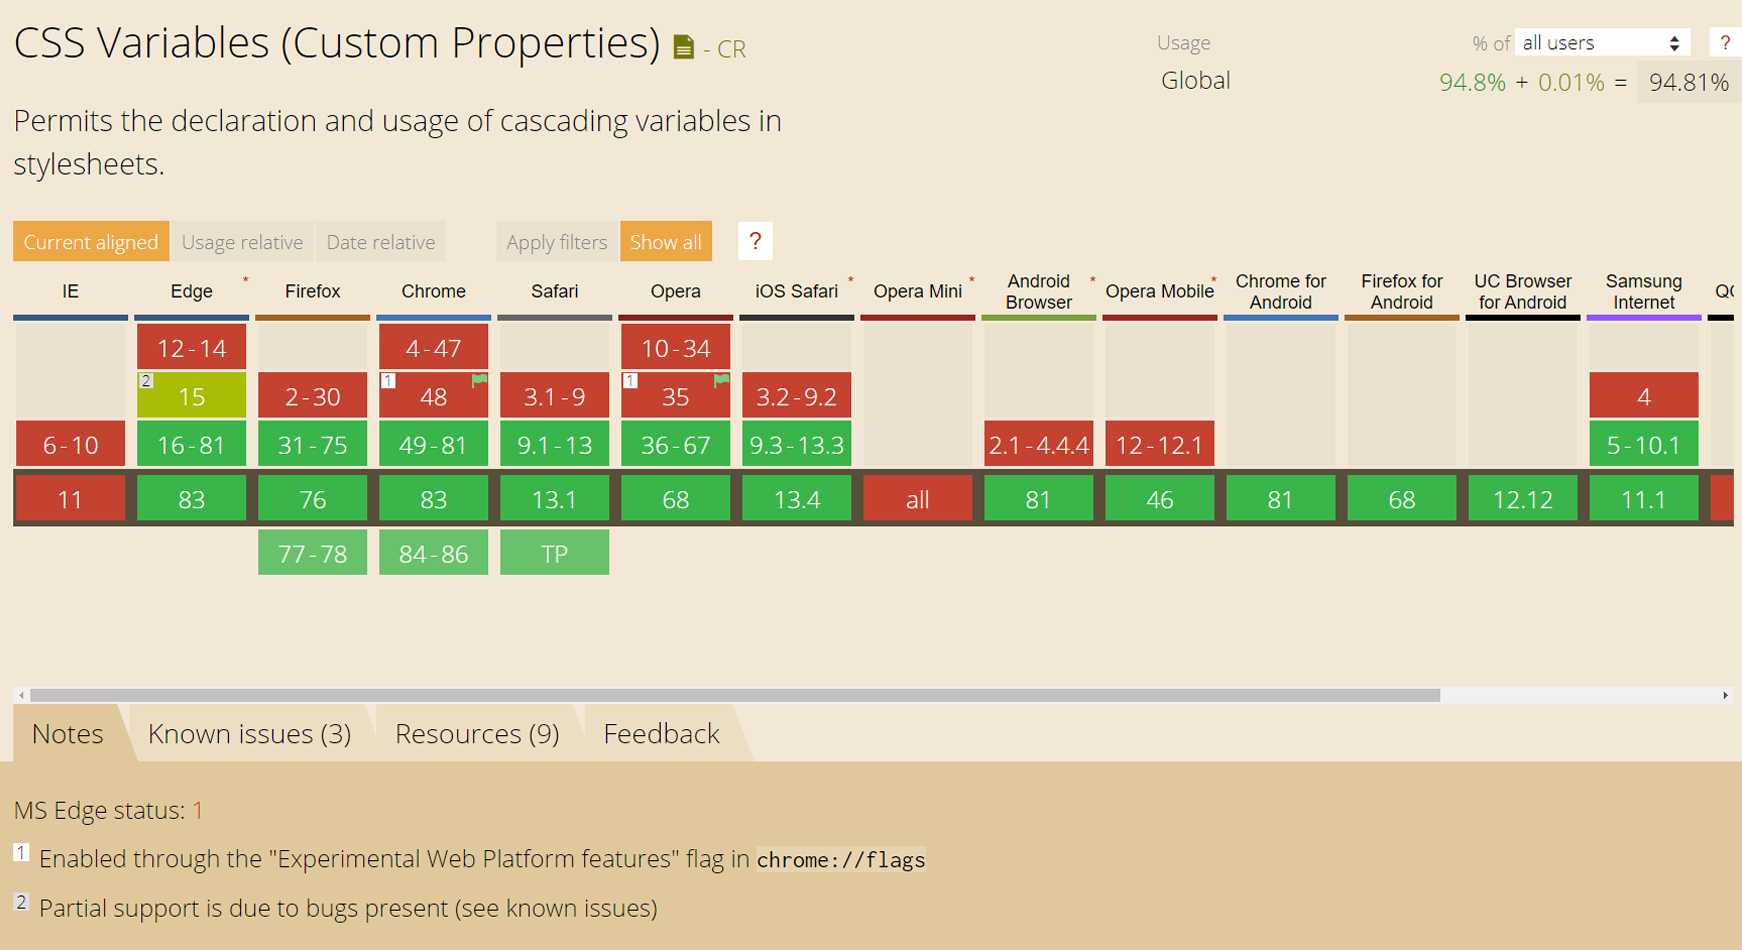
本篇記錄了 2 種 TypeScript(JavaScript) 的實作方式,並搭配 CSS Variables 來實作這個功能。但是:本篇會用到的兩大重點 prefers-color-scheme 跟 CSS 變數 在 IE 11 以前(含)的版本 不支援 IE 必須死。
用 Vue 實作色彩模式切換
這個作法是我在看 Nuxt.js 的官方網站原始碼時挖到的,經過一點點調整,讓他符合 Gridsome 的需求。
Vue.observable(object)
一開始先簡單看看 Vue.observable(object) 這個新增的 API,他會回傳一個具有資料響應能力的物件。
回傳的物件可以用在 Render Function 和 Computed 上,當回傳的物件資料改變時觸發更新。可以當作簡單的、微型的跨 Components 資料存放中心。
在 Vue 2.x 中,原本傳入的物件性質會被改變,跟回傳回來的物件一樣具有資料響應的能力。但在未來 Vue 3.x 中,只有回傳回來的物件是具有資料響應的能力。所以官方建議,考量相容性,應該去操作的是回傳回來物件,而不是傳進去的物件。
實作
認識了 Vue.observable(object) 就可以來進行實作啦!
1. 基本實作
// '~/plugin/theme.ts'
import Vue from 'vue'

export interface ThemeObserver {
  value: 'light' | 'dark'
  set: (value: 'light' | 'dark') => void
}

export const theme: ThemeObserver = Vue.observable({
  value: 'light',
  set(value) {
    this.value = value
    storage.set('theme', value)
    document.documentElement.setAttribute('data-theme', this.value)
  }
})
首先我先建立一個 theme 物件,裡面有一個 value 屬性與 set(value) 方法,這兩個屬性跟方法分別用處是:
value:紀錄當前的色彩模式,預設為 light。set(value):修改當前色彩模式。
基本上只能夠透過 set(value) 去修改 value,並同時會更動 document.documentElement 上的 data-theme 屬性值,搭配 CSS 達到切換色彩模式的效果。
不過這時就會需要考慮,當一段時間後使用者再次開啟這個網站,這時不論如何都會像是一切都沒有發生過被回歸預設值。怎麼辦呢!把使用者的選擇的喜好存在 localStorage 上吧!
2. 導入 store
這裡的 store 是指 一個叫 store.js - Cross-browser storage for all use cases, used across the web. 的 Library
// '~/plugin/theme.ts'
import Vue from 'vue'
import * as storage from 'store'

export interface ThemeObserver {
  value: 'light' | 'dark'
  set: (value: 'light' | 'dark') => void
}

export const storagValue: ThemeObserver['value'] || undefined = storage.get('theme')

export const theme: ThemeObserver = Vue.observable({
  value: storagValue || 'light',
  set(value) {
    this.value = value
    storage.set('theme', value)
    document.documentElement.setAttribute('data-theme', this.value)
  }
})
我先嘗試取得 localStorage 中 key 為 theme 的 value,並且如果有值的話就使用,如果沒有,則使用預設值 light。
3. 依照使用者系統設置色彩模式為預設值
接下來,如果我希望預設值可以依照使用者系統設定的色彩模式去當預設值,怎麼辦呢?我這裡使用了 window.matchMedia()
window.matchMedia(mediaQueryString: string): MediaQueryList
這個 Web API 可傳入一個 mediaQueryString 字串,他可以接受任何的 CSS @media 規則,回傳一個 MediaQueryList 物件,我們可以依照 MediaQueryList.matches 的 true 或 false 值判定使用者的環境是是否符合前面輸入的 CSS @media 規則。
確認使用者系統色彩模式的 CSS @media 為:prefers-color-scheme: dark,而我們要知道顯在的色彩模式維和可以寫成這樣 window.matchMedia('(prefers-color-scheme: dark)'),如果現在系統設定為深色模式,matches 的值就會為 true
// '~/plugin/theme.ts'
import Vue from 'vue'
import * as storage from 'store'

export function genDarkQuery() {
  try {
    return window.matchMedia('(prefers-color-scheme: dark)')
  } catch (error) {
    return null
  }
}

export interface ThemeObserver {
  value: 'light' | 'dark'
  set: (value: 'light' | 'dark') => void
}

export const storagValue: ThemeObserver['value'] || undefined = storage.get('theme')

export const theme: ThemeObserver = Vue.observable({
  value: storagValue || (genDarkQuery()?.matches ? 'dark' : 'light'),
  set(value) {
    this.value = value
    storage.set('theme', value)
    document.documentElement.setAttribute('data-theme', this.value)
  }
})
這裡因為 Gridsome 會透過 Node.js 生成靜態網頁檔,而 Node 的環境裡面沒有 matchMedia 所以這裡選用了 try...catch 來處理。
掛到 Vue 實例上
以 Gridsome 為例,接下來移動到 main.ts 吧!
// main.ts
import { theme, genDarkQuery } from '~/plugin/theme.ts'

const client = (Vue, { appOptions, isClient }) => {
  appOptions.$theme = theme

  Vue.use(() => {
    Object.defineProperty(Vue.prototype, '$theme', {
      get() {
        return theme
      }
    })
  })
}
這樣我只要在 Vue Component 中任何地方,都可以用 this.$theme.set('light' | 'dark') 來設定現在的色彩模式了,並且因為經過 Vue.observable(object) 的處理,只要 value 改變,他就能通知所有有用到他的地方一起更新,真的很方便呢!
接下來,我希望當我系統切換色彩模式的時候,網頁也會跟著響應,最後再在 document.documentElement 上設定 data-theme 的值讓 CSS 知道該為他加上什麼樣式。
// main.ts
import { theme, genDarkQuery } from '~/plugin/theme.ts'

const client = (Vue, { appOptions, isClient }) => {
  isClient.$theme = theme

  Vue.use(() => {
    Object.defineProperty(Vue.prototype, key, {
      get() {
        return theme
      }
    })
  })

  // 確保為 isClient
  if (isClient && window !== undefined) {

    // genDarkQuery(): MediaQueryList | null
    // 驚嘆號:類型斷言運算符(type assertion operator)
    // 用來告訴編譯器,這時的值一定存在
    genDarkQuery()!.addListener(({ matches }) => {
      theme.set(matches ? 'dark' : 'light')
    })

    document.documentElement.setAttribute('data-theme', theme.value)
  }
}
如果是像 Gridsome 這樣會在 Node.js 裡面生成靜態網頁檔,那千萬要記得 讓會調用到 Web API 的部分要限定只在 clinet 端跑起來,不然可能在 build 時就會出問題了。
所以上面說到 " Vue Component 中任何地方,都可以用 " 可能要改成:生命週期 beforeCreate、created 之後,因為這兩個生命週期在 server side 也會跑起來。
以上就是我目前我用在這個部落格的方法,來關心一下支援度問題。
window.matchMedia() 支援度 Can I use window.matchMedia
prefers-color-scheme 支援度 Can I use prefers-color-scheme
...安息吧!IE
其他的色彩模式切換的方式
Vue.observable(object) 是新出的 API,那如果用的是 Vue 2.6.0 以前的版本呢?升級
接下來這最早是在 Gridsome 的官方網站原始碼裡找到的,但因為我後來沒有採用這個方法,所以下面都 code 就會是 JavaScript 版啦!這個方法不限定在 Vue 裡面可以使用。
首先打開 index.html 加上這段:
// Add dark / light detection that runs before Vue.js load. Borrowed from overreacted.io
(function() {
  window.__onThemeChange = function() {};
  function setTheme(newTheme) {
    window.__theme = newTheme;
    preferredTheme = newTheme;
    document.body.setAttribute('data-theme', newTheme);
    window.__onThemeChange(newTheme);
  }

  var preferredTheme;
  try {
    preferredTheme = localStorage.getItem('theme');
  } catch (err) { }

  window.__setPreferredTheme = function(newTheme) {
    setTheme(newTheme);
    try {
      localStorage.setItem('theme', newTheme);
    } catch (err) {}
  }

  var darkQuery = window.matchMedia('(prefers-color-scheme: dark)');

  darkQuery.addListener(function(e) {
    window.__setPreferredTheme(e.matches ? 'dark' : 'light');
  });

  setTheme(preferredTheme || (darkQuery.matches ? 'dark' : 'light'));
})();
概念跟從 Nuxt.js 官網挖到的差不多,都是利用 window.matchMedia('(prefers-color-scheme: dark)') 回傳的物件去判定當下的色彩模式是哪一種,並監聽系統設置的變化更去更新畫面。
並且在要控制色彩模式的 components 裡面這樣處理
let themes = ['light', 'dark']

export default {
  data() {
    return {
      theme: 'light',
    }
  },
  computed: {
    nextTheme() {
      const currentIndex = themes.indexOf(this.theme)
      const nextIndex = (currentIndex + 1) % themes.length
      return themes[nextIndex]
    }
  },
  methods: {
    toggleTheme() {
      const currentIndex = themes.indexOf(this.theme);
      const nextIndex = (currentIndex + 1) % themes.length;
      window.__setPreferredTheme(themes[nextIndex])
      this.theme = themes[nextIndex]
    }
  },
  async mounted() {
    // set default
    if (typeof window.__theme !== 'undefined') this.theme = window.__theme
  }
}
在 toggleTheme 這個 methods 中會去找到下一個色彩模式的名稱,按下時呼叫 window.__setPreferredTheme() 去改變設定。
這邊有一個有趣的點,這段 code 從頭到尾沒有一個地方有意義的呼叫 window.__onThemeChange() 這個 function 註解掉後也沒跑出任何的錯誤,著實猜不透有什麼用意。
後來直接把 window.__onThemeChange 當關鍵字搜尋,發現,原來 Gridsome 也是從別的地方參考過來的啊!而原始出處正是 Redux 的作者:Dan Abramov 的個人部落格。而 window.__onThemeChange() 這段在他的色彩模式切換設計裡面是有使用的,如果對 Dan Abramov 原本的做法有興趣可以去找到他的原始碼來看(他是使用 React 製作的!)。
利用 CSS 變數(CSS Variables)管理配色
色彩模式切換裏頭,樣式管理也是一大問題,如果用傳統的方法,就要不斷地去判斷現在的 data-theme 值是什麼,著實有點麻煩,如果這時突然再多一種模式要管理,很令人崩潰。
好險 CSS Variables 可以有效的破解者個問題,CSS Variables 一出現就席捲整個前端圈(因為支援度問題所以並沒有),依照上面色彩模式的設定,我只要在 :root 中定義我的變數,接下來在之後的其他地方就可以盡情使用了!
:root[data-theme="dark"] {
  --color-text: #efefef;
  --color-background: #18202a;
  --color-code: #f548bd;
}

:root[data-theme="light"] {
  --color-text: #222222;
  --color-background: #efefef;
  --color-code: #c30085;
}

html {
  background-color: var(--color-background);
  color: var(--color-text);
}
不過還是來看一下支援度好了
CSS Variables 支援度 Can I use CSS Variables
當然 IE 毫不意外,另外 CSS 變數能應用的範圍相當的廣,這邊只是其中一種用法。
結語
深色模式牽涉到技術支援度問題。以關鍵之一的 prefers-color-scheme 來說,都要到 Chrome 76 (2019 年 7 月左右推出)之後才支援,也難怪近期才有越來越多網站將加入該功能。
這篇記錄了兩種程式面的實作方法,第一種是從 Nuxt.js 官網原始碼挖出來的,第二種是從 Gridsome 官網原始碼找到的。之所以會選擇第一種一方面是想嘗試 Vue.observable(),二方面是因為我自己比較不偏好將變數掛到 window 上使用,所以選擇了第一種。但第二種設計的好處在於,他可以依照陣列裡面的值去拓展更多模式,不限於只有 light / dark 的切換,未來也會考慮往這個方向調整。
另外 Nuxt.js 在前陣子更換了色彩模式切換的功能,更強大,並將其包成模組,如果是使用 Nuxt.js 的捧油可以參考看看囉!
參考連結
請我喝杯咖啡
如果這裡的內容有幫助到你的話,一杯咖啡就是對我最大的鼓勵。
