深入解析 Nuxt.js 的 <nuxt-link> Smart Prefetching 實作
Smart Prefetching(或稱 Router Prefetch) 機制改善了使用者等待換頁請求的體驗,他讓頁面切換更為順暢。在 Nuxt.js 中內建的 <nuxt-link> 組件也實做了這項功能,讓我們一起從 Nuxt.js 的 source code 中認識這項技術並從中吸取大神們的寶貴經驗吧!
前言
這裡以 Nuxt.js 2.12.0 的版本為主,本篇撰寫當下 Nuxt.js 最新的版本為 2.14.3,但在
<nuxt-link>組件上差異不大。在開發模式中,會有兩個路由組件的檔案,分別為 nuxt-link.server.js 與 nuxt-link.client.js 兩隻檔案,這裡會聚焦在nuxt-link.client.js。
<nuxt-link> 為 Nuxt.js 的路由切換組件。他的 API 跟 Vue Router 的 <router-link> 幾乎一模一樣,差別在於 Nuxt.js 為 <nuxt-link> 增加了 Smart Prefetching 的功能,讓使用者在切換頁面時更為順暢。
不過現在普遍使用者的網路下載速度大多時候都可以到 10 幾 Mbps 以上,所以一般而言 Smart Prefetching 提升的頁面切換速度提升其實真不容易被察覺,但我們後是可以透過 Chrome DevTools 中的 Network 面版模擬低網速的方式來觀察。
以下範例利用 Chrome DevTools 模擬 fast 3g 的網路速度,左側有 prefetch 與右側則沒有。要稍微仔細觀察他們之間的差異,是範例組件做的比教單純,但如果再複雜一點差異就會被放大。
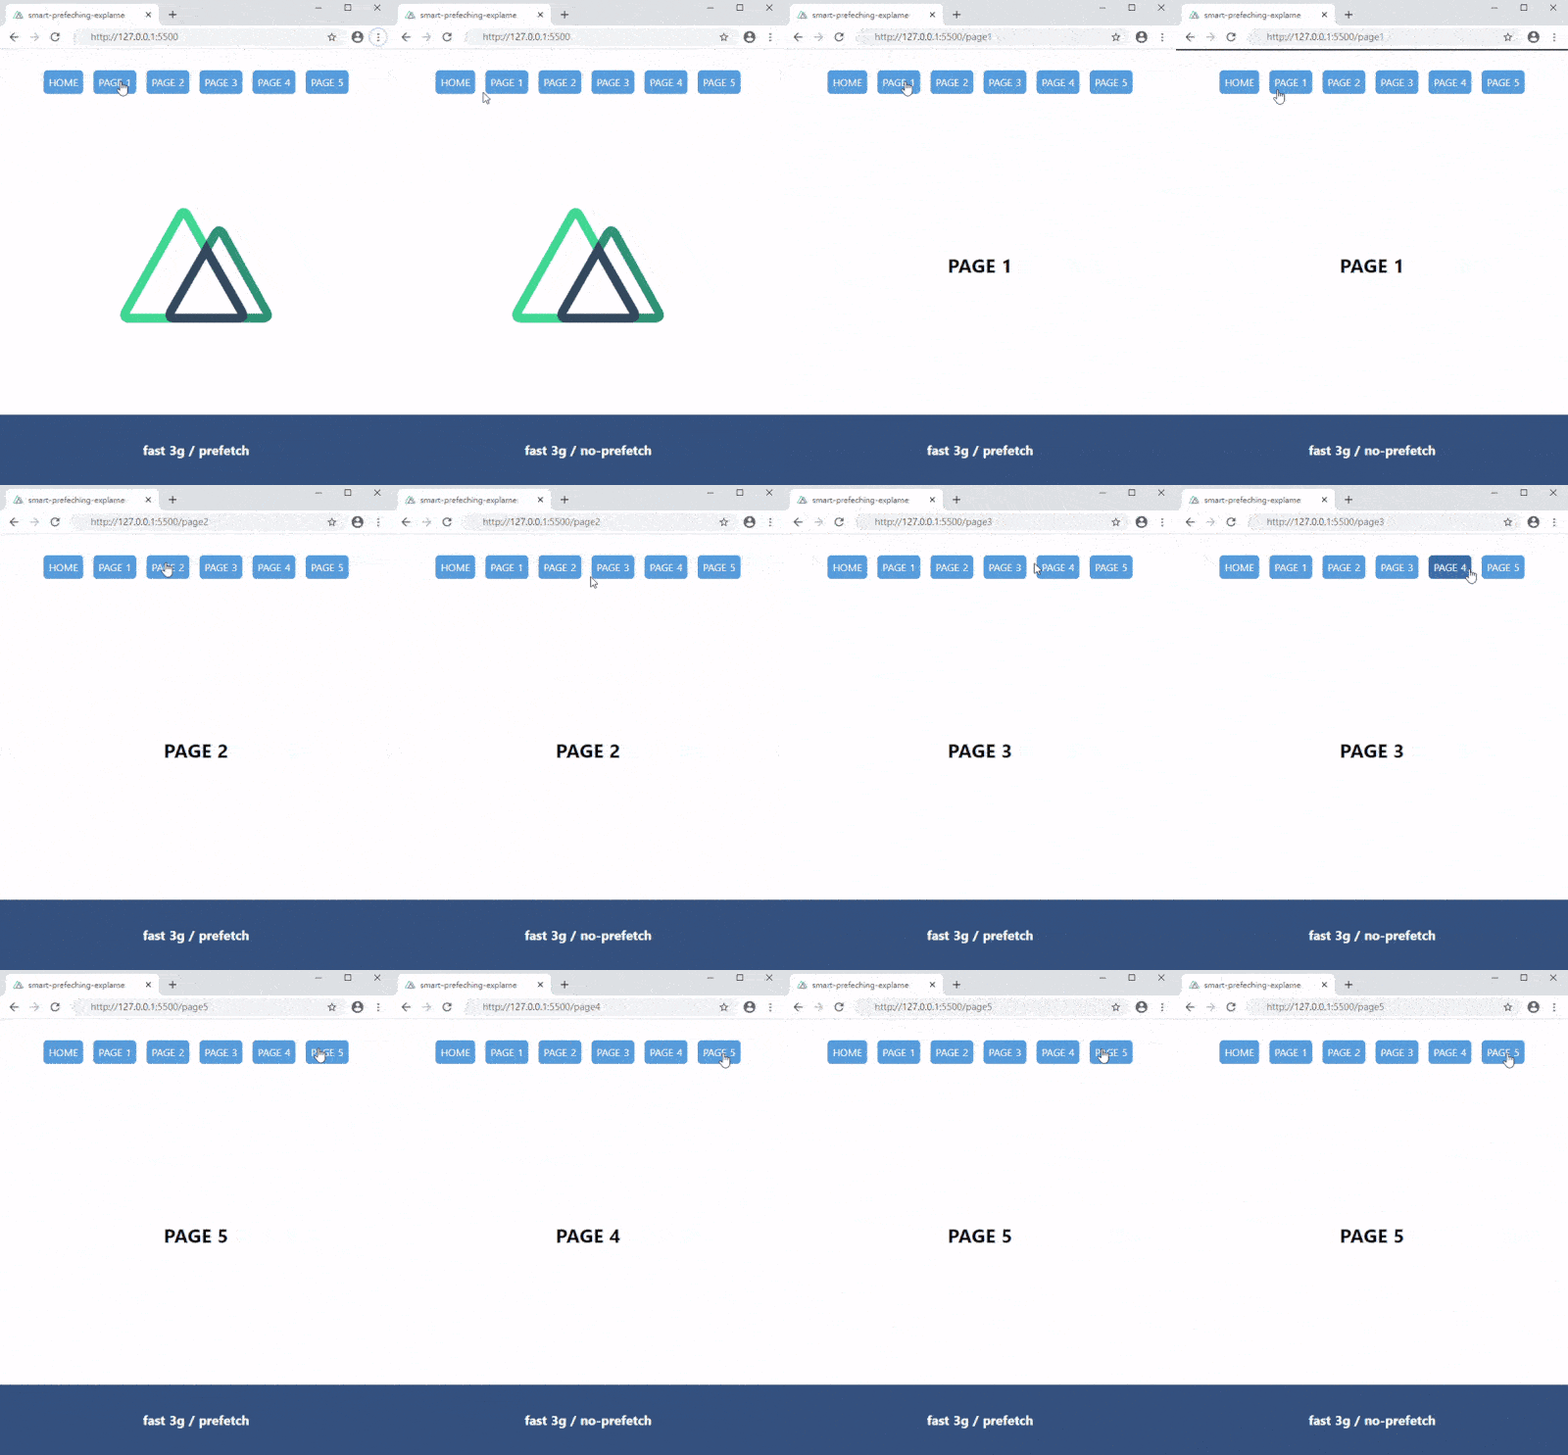
由此可知 Smart Prefetching 功能對於在網路速度較差的情況下,能讓使用者保持相對順暢的使用體驗。
nuxt-link 使用方式
在開始了解 <nuxt-link> 的原始碼前,先來看過他的 API 設計。
<nuxt-link> 與 <router-link> 的路由組件使用方式大致相同,除此之外 <nuxt-link> 多了兩個屬性可以設定,分別是:
prefetch- Type: Boolean,
- Default:
true(在 Nuxt.js 2.10.0 之後會根據nuxt.config.js中不同的設定有不同的預設)
no-prefetch- Type: Boolean,
- Default:
false
從字面可以理解,使用者可以透過給予 prefetch 或 no-prefetch 不同的值,決定是否要執行 prefetch。預設狀況都是會 prefetch 的,如果要關閉 prefetch 方式如下:
<nuxt-link to="/about" no-prefetch>About page not pre-fetched</nuxt-link>
<!-- or -->
<nuxt-link to="/about" :prefetch="false">About page not pre-fetched</nuxt-link>
如果是使用 Nuxt.js 2.10.0 之後的版本,則可以在 nuxt.config.js 中直接將 prefetch 給關閉。
// nuxt.config.js

export default {
  router: {
    prefetchLinks: false
  }
}
這時如果特定連結想要啟用 prefetch 的話再將其開啟
<nuxt-link to="/about" prefetch>About page pre-fetched</nuxt-link>
接下來進入到本篇重點,Nuxt 是如何實做 Smart Prefetching 的呢?
nuxt-link 實作內容
要開始深入 <nuxt-link> 的實作內容前,如果有基本的 Vue Router API 認識會更好,以及接下來會先簡介三個會使用到的 Web APIs,之後再開始實作分析部分。
使用到的 Web API
IntersectionObserver
如同開頭部分所提及,可以觀察元素是否進到畫面或指定區域,對於不支援的瀏覽器需要自己引入對應的 polyfill。這之前研究過這個 Web API 的細節,有興趣的可以看這篇:Intersection Observer API 使用筆記requestIdleCallback
相對於requestAnimationFrame是在畫面更新的每一幀(frame)更新時執行 callback,這裡的requestIdleCallback則是在 幀與幀之間的空檔視情況執行,且執行的 callback 不建議含有修改 DOM 的操作。
使用方式如下:var handle = window.requestIdleCallback(callback[, options])options為一個物件,可以設定的參數如下(目前也只有一個參數):- timeout
- Type:
Number - 超時強制執行時間,如果超過這個時間都還等不到空檔執行 callback,就強制呼叫他執行。
- Type:
如果在requestIdleCallback的 callback 執行前要清除他的話則需要用到cancelIdleCallback
使用方式如下:window.cancelIdleCallback(handle)
這樣看起來requestIdleCallback()的用法是不是跟setTimeout()很像!
支援度部分,根據 MDN 表示,這還是是一個實驗中的功能,目前像是 Safari 尚未支援,不過 Nuxt.js 在實作上有為其添加簡易的 polyfill。- timeout
navigator.connection
這裡會用到navigator.connection中的effectiveType及saveData屬性。effectiveType這個屬性全名:Effective connection type(ECT,Google 翻譯:有效連接類型),而這個屬性可能的值(狀態)如下:type EffectiveConnectionType = 'slow-2g' | '2g' | '3g' | '4g'
在 MDN 的 Effective connection type 中,對每一個狀態對應的網路下載速率有清楚的定義。而<nuxt-link>會依照effectiveType是否含有 2g (網路速度要 3g 以上)來決定是否進行 predetch。
另外一個saveData則是如果使用者有設定減少流量之類的設定,他就會返回 true。
不過navigator.connection一樣有支援度的問題,在 FireFox 需要自行啟動這項功能(依然不支援 effectiveType 跟 saveData),而 Safari 則是完全不支援。
nuxt-link 的 JavaScript 詳細解析
如果對於前面提到的三個 Web API 都有了基本認識的話,接下來的部分就應該是蠻好理解的!以下會詳細說明每一段 JavaScript 的功能,一步一步拆解 <nuxt-link> 實作的內容。
1. 觀察 <nuxt-link> 是否進到畫面
首先先建立一個 IntersectionObserver 實例,但如果瀏覽器不支援且沒有加入需要的 polyfill 這裡拿到的就會是 undefined
const observer = window.IntersectionObserver &&
  new window.IntersectionObserver((entries) => {
    entries.forEach(({ intersectionRatio, target: link }) => {
      if (intersectionRatio <= 0) {
        return
      }
      link.__prefetch()
    })
  })
callback 的部分。當被觀察的 DOM 進入到畫面時,就去執行 DOM 上的 __prefetch() 方法,透過這個方法去 prefetch 需要的頁面組件。
這裡所有 <nuxt-link> 組件都會共用同一個 IntersectionObserver 實例。但 observer 實例無法直接取用每個組件實例上的 prefetch 方法,為此 Nuxt 選擇的作法是:在組件將 DOM 物件交給 observer 前,先在 MOD 上加上一個 __prefetch 屬性並將 prefetch 方法的參考傳入。這樣一來,就可以讓 observer 在觀察到 DOM 進入到畫面時透過呼叫該 DOM 上的 __prefetch() 取用到組件實例上面的方法囉!
2. 處裡 requestIdleCallback() 的相容議題
如果遇到不支援 requestIdleCallback() 的瀏覽器,則用 setTimeout() 替代。
const requestIdleCallback = window.requestIdleCallback ||
  function (cb) {
    const start = Date.now()
    return setTimeout(function () {
      cb({
        didTimeout: false,
        timeRemaining: () => Math.max(0, 50 - (Date.now() - start))
      })
    }, 1)
  }

const cancelIdleCallback = window.cancelIdleCallback ||
  function (id) { clearTimeout(id) }
由於 Event Loop 的特性,setTimeout 的 callback 會在所有執行堆疊(called stack)的工作跑完後才開始計時並執行,所以這裡的目的就是讓傳進來的 callback 等到其他事情處裡玩後才執行。
另外 cb() 中傳入的 didTimeout 跟 timeRemaining() 是在模擬 requestIdleCallback() 的 callback 接收的的參數 IdleDeadline,但接下來的實作不會使用到這個部分。
3. <nuxt-link> 組件設計
以下為了不要一次上放太長的 JavaScript,我先將 methods 獨立出來。
observe ()- 將 DOM 託付給 observerobserve () { // If no IntersectionObserver, avoid prefetching if (!observer) { return } // Add to observer if (this.shouldPrefetch()) { this.$el.__prefetch = this.prefetchLink.bind(this) observer.observe(this.$el) this.__observed = true } }
在這裡會將this.$el這個 DOM 交由 observer 觀察,如果 observer 不存在(瀏覽器不支援 Intersection Observer API 時)則直接結束,後面所有事情的都不會做了。
這裡還會先透過shouldPrefetch ()這個方法確認該路由頁面組件是否需要 prefetch,如果確定需要才進行以下動作- 將執行 prefetch 的方法:
prefetchLink()的參考放到 DOM 物件上,這邊是為了讓在外面的 observer 取用組件上的方法。 - DOM 託付給 observer 觀察。
- 最後將
this.__observed標記為 true 表示 DOM 已在觀察中,之後銷毀改組件時會依照此標記判斷是否取消觀察。
- 將執行 prefetch 的方法:
shouldPrefetch ()- 應該要 prefetch 嗎?shouldPrefetch () { return this.getPrefetchComponents().length > 0 }
這裡會回傳需要 prefetch 的頁面組件陣列getPrefetchComponents ()數量是否大於 0`。getPrefetchComponents ()- 需要 prefetch 的組件有哪些getPrefetchComponents () { const ref = this.$router.resolve(this.to, this.$route, this.append) const Components = ref.resolved.matched.map(r => r.components.default) return Components.filter(Component => typeof Component === 'function' && !Component.options && !Component.__prefetched) }
這個方法會回傳一個需要 prefetch 的頁面組件陣列。
首先,$router.resolve()可以取得一包解析過的路由資訊,如果不熟的人(指我),以下是這個方法的定義:// router.d.ts export declare class VueRouter { // ...略... resolve(to: RawLocation, current?: Route, append?: boolean): { location: Location route: Route href: string // backwards compat normalizedTo: Location resolved: Route } // ...略... } export interface Route { path: string name?: string | null hash: string query: Dictionary<string | (string | null)[]> params: Dictionary<string> fullPath: string // 會用到這個屬性 // 但 RouteRecord 的 interface 就先不列了 matched: RouteRecord[] redirectedFrom?: string meta?: any }
參數部分:to:要解析的路由,這裡就會是<nuxt-link to="這裡的值">。current:當前路由資料。append: 是否 append,在組件上這樣設定的地方<nuxt-link to="/" :append="true | false">(想不到中文怎麼講比較恰當)。
接著針對回傳值裡面的resolved屬性找到所需要的頁面組件,並再從中過濾出真正需要欲取的組件,以下說明過濾條件:// 過濾條件 Components.filter(Component => ( typeof Component === 'function' && !Component.options && !Component.__prefetched ))typeof Component === 'function'
檢查 Component 的型別是否為 function,在 Nuxt.js 依照資料夾結構生成的 routes 都會是動態載入的 async function。!Component.options
如果是有開啟過的頁面,在 Nuxt.js 這裡解析匹配的頁面組件時取得的會是該組件的 constructor(型別也是 function),這時可以依有沒有options屬性判斷是否開啟過,沒有開啟過頁面組件的才需要進行 prefetch。!Component.__prefetched
當第一次 prefetch 時會在該組件(這時還是 async function)加上__prefetched的屬性,這樣下次判斷就可以知道這個部分已經預取過了。這只在未訪問過的頁面組件上有效,如果該頁面被訪問過,則會被替換成該組件的 constructor,如上一步提過的。
如果以上的都為 true(組件型別為 function、沒有 options 屬性、沒有 __prefetched 屬性)時,表示該頁面組件需要預取。
補充
Nuxt.js 這裡用的是router.resolve回傳的resolved屬性,但在 Vue Router 2.2.0 的 releases log 裡面有提到這個屬性與normalizedTo已經不推薦使用,現在保留這個屬性是為了向下兼容,在官方文件上也已經看不到這兩個屬性了,取而代之的分別是route跟location。prefetchLink ()- 執行 prefetchprefetchLink () { if (!this.canPrefetch()) { return } // Stop observing this link (in case of internet connection changes) observer.unobserve(this.$el) const Components = this.getPrefetchComponents() for (const Component of Components) { const componentOrPromise = Component() if (componentOrPromise instanceof Promise) { componentOrPromise.catch(() => {}) } Component.__prefetched = true } }
在這裡先判斷了當下的網路狀態是否應該要執行canPrefetch ()。之後在開始 prefetch 前告訴 observer 解除對該 DOM 的觀察,並且開始預取,最後在發出 prefetch 請求的組件上加上__prefetched屬性。canPrefetch ()- 可以 prefetch 嗎canPrefetch () { const conn = navigator.connection const hasBadConnection = this.$nuxt.isOffline || (conn && ((conn.effectiveType || '').includes('2g') || conn.saveData)) return !hasBadConnection }
Nuxt App 在初始化後會將自己的實例掛到Vue.prototype.$nuxt上,這裡的this.$nuxt.isOffline取得了當下的網路連線狀態,如果是離線狀態的話為 true。
再來就看到了navigator.connection的部分,如果瀏覽器支援,則去檢查 effectiveType 是否含有 2g 的字眼,以及確認 saveData 看看使用者有沒有開啟節省流量的設定。
如果其中一邊為 true 則表示現在不適合預取(最後回傳的是!hasBadConnection),遇到不支援navigator.connection或effectiveType跟saveData這兩個屬性的瀏覽器,則只會依照是否為離線狀態決定要不要 prefetch。
FireFox 79.0 目前雖然可以手動開啟navigator.connection的支援,但也依然不支援effectiveType跟saveData這兩個屬性。
再來進入 methods 以外的部分(唉?)
export default {
name: 'NuxtLink',
extends: Vue.component('RouterLink'),
props: {
prefetch: {
type: Boolean,
default: true
},
noPrefetch: {
type: Boolean,
default: false
}
},
mounted () {
if (this.prefetch && !this.noPrefetch) {
this.handleId = requestIdleCallback(this.observe, { timeout: 2e3 })
}
},
beforeDestroy () {
cancelIdleCallback(this.handleId)
if (this.__observed) {
observer.unobserve(this.$el)
delete this.$el.__prefetch
}
},
methods: {
// ...略...
}
}
在這裡可以看到 <nuxt-link> 實作繼承自 <router-link> 並增加了兩個 props:prefetch 跟 noPrefetch。
在組件掛載到畫面上後判斷使用者是否想要 prefetch 該組件的路由,並利用 requestIdleCallback() 將 this.observe 推遲到每一幀之間的空檔處理,超時強制執行時間設定為 2000 ms。
頁面在初始化時瀏覽器有相對繁重的組件初始化要執行,擠在這個時候將這些想要觀察的 DOM 塞給 observr 其實相對沒必要,這件事可以等瀏覽器有空的時候在處理,因此有了這樣的設計。
最後組件銷毀時,清除 requestIdleCallback,如果 DOM 已經交由 observer 觀察,便取消觀察,並且將 DOM 上的 __prefetch() 方法給刪除。整個組件設計有兩個地方會取消 observer 對 DOM 的觀察,其一是開始 prefetch 前,這裡則是當組件要被銷毀時,有可能該 DOM 還沒有進到畫面,這時就要在這裡取消觀察,以免資源占用在一個不存在的 DOM 上面。
以上就是 <nuxt-link> 大部分實作的內容。
nuxt-link 的完整 JavaScript
整合以上內容,完整的組件 JavaScript 如下:
// nuxt-link.client.js
import Vue from 'vue'
const requestIdleCallback = window.requestIdleCallback ||
function (cb) {
const start = Date.now()
return setTimeout(function () {
cb({
didTimeout: false,
timeRemaining: () => Math.max(0, 50 - (Date.now() - start))
})
}, 1)
}
const cancelIdleCallback = window.cancelIdleCallback || function (id) {
clearTimeout(id)
}
const observer = window.IntersectionObserver && new window.IntersectionObserver((entries) => {
entries.forEach(({ intersectionRatio, target: link }) => {
if (intersectionRatio <= 0) {
return
}
link.__prefetch()
})
})
export default {
name: 'NuxtLink',
extends: Vue.component('RouterLink'),
props: {
prefetch: {
type: Boolean,
default: true
},
noPrefetch: {
type: Boolean,
default: false
}
},
mounted () {
if (this.prefetch && !this.noPrefetch) {
this.handleId = requestIdleCallback(this.observe, { timeout: 2e3 })
}
},
beforeDestroy () {
cancelIdleCallback(this.handleId)
if (this.__observed) {
observer.unobserve(this.$el)
delete this.$el.__prefetch
}
},
methods: {
observe () {
  // If no IntersectionObserver, avoid prefetching
  if (!observer) {
    return
  }
  // Add to observer
  if (this.shouldPrefetch()) {
    this.$el.__prefetch = this.prefetchLink.bind(this)
    observer.observe(this.$el)
    this.__observed = true
  }
},
shouldPrefetch () {
  return this.getPrefetchComponents().length > 0
},
canPrefetch () {
const conn = navigator.connection
const hasBadConnection = this.$nuxt.isOffline || (conn && ((conn.effectiveType || '').includes('2g') || conn.saveData))
return !hasBadConnection
},
getPrefetchComponents () {
  const ref = this.$router.resolve(this.to, this.$route, this.append)
  const Components = ref.resolved.matched.map(r => r.components.default)

  return Components.filter(Component => typeof Component === 'function' && !Component.options && !Component.__prefetched)
},
prefetchLink () {
  if (!this.canPrefetch()) {
    return
  }
  // Stop observing this link (in case of internet connection changes)
  observer.unobserve(this.$el)
  const Components = this.getPrefetchComponents()

  for (const Component of Components) {
    const componentOrPromise = Component()
    if (componentOrPromise instanceof Promise) {
      componentOrPromise.catch(() => {})
    }
    Component.__prefetched = true
  }
}
}
}
以上 JavaScript 可以在開發中的 Nuxt.js 專案中找到,位置於根目錄的 .nuxt/components/nuxt-link.client.js 中。
最一開始有提到,依照 nuxt.config.js 設定的不同,會有些許的差異,像是如果在這裡將 <nuxt-link> 的 prefetch 機制給關閉,這裡所產出的 props.prefetch.default 就會是 false。
詳細內容會放在最後的參考連結裡面。
在 Vue CLI 專案應用 Smart Prefetching
看完以上內容除了更了解 Nuxt.js 冰山一小小角的實作外,遇到使用 Vue CLI 建立的專案也可以將 <nuxt-link> 的 Smart Prefetching 功能應用在其中。不過還是有幾點要特別注意:
- Vue Router 裡的 component 設定必須採用動態載入的方式,不然其實也不需要 prfetch。
const router = new VueRouter({
  mode: 'history',
  base: process.env.BASE_URL,
  routes: [
    {
      path: '/',
      name: 'Home',
      component: () => import('../views/Home.vue'),
    },
    {
      path: '/about',
      name: 'About',
      component: () => import('../views/About.vue'),
    },
    {
      path: '/news',
      name: 'News',
      component: () => import('../views/News.vue'),
    }
  ],
});
- 原本
getPrefetchComponents ()內需要判斷Component.options是因為在 Nuxt.js 中如果是開啟過的頁面組件,在解析匹配的頁面組件時取得的會是該組件的 constructor,但在 Vue CLI 環境中取的的會直接是 Component.options,型別為物件。
也因此在判斷是否該 prefetch 時,可以型別是否為 function 或是有無 __prefetched 標記即可。
getPrefetchComponents ()中的this.$nuxt.isOffline記得移除,或自己另外實作。- Vue CLI 預設就有對動態載入的組件進行 prefetch 的機制
<link rel="prefetch"> 是一種 resource hint,他可以利用瀏覽器空閒的時間去預取未來可能會需要的內容。
Vue CLI 預設會針對所有 async chunk(動態載入,Dynamic Imports) 的組件自動產出 prefetch hint,所以其實不用自己動手處理。但萬一專案規模較大,這時 " 所有 " 都 prefetch 還是有點可怕,這個部分 Vue 官方也建議將此設定關閉,改用手動的方式處理。
手動關閉 Vue CLI 的 prefetch hint
// vue.config.js
module.exports = {
  chainWebpack: config => {
    // 移除 prefetch plugin
    config.plugins.delete('prefetch')
  }
}
關閉 prefetch hint 後可以選擇一個個手動設定,或是參考 <nuxt-link> 的 Smart Prefetching 設計囉!
結語
雖然篇幅有點長,但整體而言 <nuxt-link> 的實作方式並沒有非常困難。
除了本篇的 <nuxt-link> 以外,之前在 「Intersection Observer API 使用筆記」 中也有提到 Gridsome 的 <g-link> 組件也使用了這個 API 實作了 prefetch 的功能。另外在 React 體系的 Next.js 和 Gatsby.js 分別在他們的 Link 組件中也使用了類似的手法去預取組及需要的資源。
除了各大框架實作外,新版的 Facebook 在實作上則是採用 hover event 跟 mouse event 去處理他們的 prefetch 機制,更智能的預取真正可能需要的資源。不過也可能因為 Facebook 的流量超大,同時出現在畫面上的資源更為繁重,所以需要更為精準的 prefetch 手段。一般情形下使用 Intersection Observer API 判斷需要 prefetch 的資源應該就已經非常足夠了。
如果工作中尚未導入前端框架的機制,也可以考慮使來自 Google Chrome Labs 的 quicklink.js,在 Nuxt.js 的官方文件中也提到,<nuxt-link> 的 Smart Prefetching 設計靈感來自於他。
參考連結
請我喝杯咖啡
如果這裡的內容有幫助到你的話,一杯咖啡就是對我最大的鼓勵。